You are here:

The situation: You’ve demoed the floor. To get a flat subfloor and set yourself up for successful installation, sanding and finishing, you’ve generally
got two possibilities:
1.The floor is mucked up with residue, screed and adhesive, let alone …
2.The subfloor needs leveling. Putting the self-levelers aside for this post, let’s look at how to use sanding to right the ship.
You know the subfloor needs to be three things if you want to have a great installation: The subfloor must be dry, flat and clean.
Here is the gist of the guidelines for wood subfloor prep from Lägler’s “Sanding of Wooden Floors” manual and from the industry horse’s mouth, the National Wood Flooring Association.
(Looking for concrete subfloor knowhow? Read “How to Prepare a Concrete Subfloor.”)
You’ve measured moisture content in the subfloor and in the wood flooring to be installed. What’s the acceptable difference between those two readings?
When installing solid strip flooring (less than 3” wide) moisture content readings need to be within four percent. For solid plank flooring (3” or wider),
the difference needs to be within two percent.
For installations using mechanical fasteners of 1 ½” and longer, the subfloor needs to be flat to ¼” within a radius of 10 feet or 3/16” within six feet.
For glue-down installations and those using mechanical fasteners shorter than 1 ½”, the subfloor should be flat to 3/16” within 10 feet or 1/8” within
fix feet.
Here is the basic but effective test. Using a long, straight edge set on the subfloor, lightly drag it across. Because the guidelines describe the tolerance
in terms of a radius, hold one end of the straight edge as the pivot point and rotate around that point as you drag the edge.
You’ll recognize if the floor is good. Flat is flat. If the tool you are using teeter-totters on a high spot or hits a dip that makes it look like a bridge
spanning a depression in the subfloor, you’ve found a spot that needs a closer look.
For more details on wood subfloor prep, read “How to Prep a Wood Subfloor” or dig
into section two of Lägler’s Sanding of Wooden Floors Manual, free to download online.
Now let’s get back to the two options you have for flattening a subfloor using a multi-disc sander or buffer.

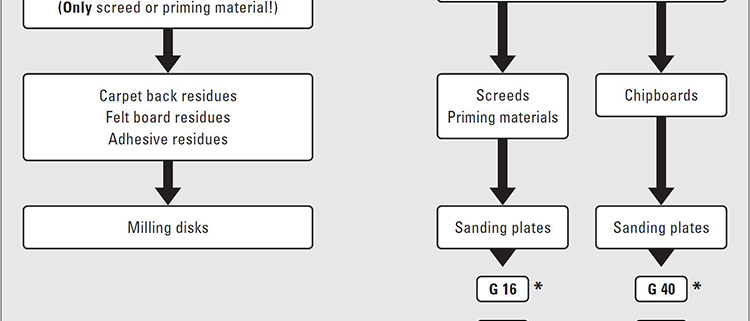
The graphic above shows to use milling discs on your multi-disc sander or buffer on a concrete subfloor, if the subfloor is rough with screed or adhesive
that needs to be removed.
For wood subfloors, do not use milling discs. Either use a milling drum on your big machine, or use the multi-disc or buffer to sand a wood subfloor. Milling
discs will dig into a wood subfloor if you stop the machine.
If you are using the milling discs to remove that kind of material with a Lägler TRIO, do not use the Velcro seal around the machine housing. The seal
can be damaged while milling.
You also can increase or decrease aggression when using milling discs on the TRIO by adding or subtracting the indexable, hard-metal inserts.
For sanding a wood subfloor flat, choose your sanding grit by whether you’re having to grind screed or priming material down or if you’re flattening uneven
plywood. If using a TRIO, you can choose to use the Velcro rings (“donuts”) or not. Leaving them off will increase aggression.
For sanding high spots in the wood, you can start with 40 or 60 grit. You likely need to choose a coarser grit for smoothing the spots with added materials:
16, 24 or 40.
Always use as fine a grit as possible but as coarse a grit as needed, for any sanding job. (Learn more about sanding abrasive quality, materials and selection:
“How to Minimize Sanding Efforts and Maximize Profits.”)
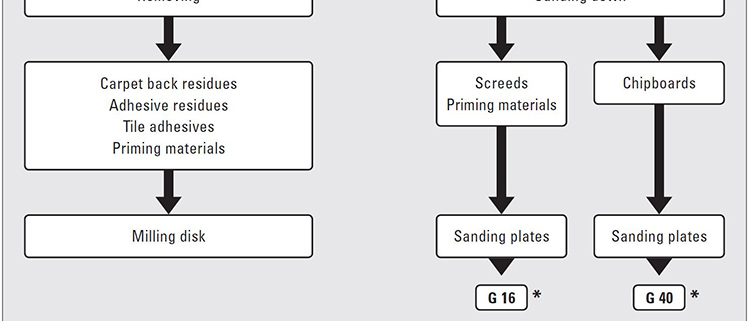
If using a buffer for prepping a subfloor for wood floor installation, Lägler’s recommendations are like its guidelines for using a multi-disc sander.
Shown in the graphic below.

Use a milling disc to cut screed, adhesives and priming material for most aggressive cutting. If the buffer you are using for subfloor prep is the Lägler
SINGLE, you can increase or decrease aggression with the milling disc by adding or subtracting the indexable ceramic inserts.
If sanding, you can increase aggression by leaving off the Velcro ring, or donut, between the sanding plate and the abrasive. If you use the Velcro ring,
it needs to be combined with hook-and-loop abrasives. We recommend using external dust collection.
If using the SINGLE, fasten the Velcro seal around the machine housing. For more aggressive cutting, use the water reservoir designed to add up to 44 pounds
(22 kilograms) on top of the housing.
Like with any wood flooring job, flexibility is key. Multi-disc sanders and buffers can flex for the situation, making subfloor prep easier and producing
the top-notch results you need to carry the whole project to a successful finish.
Learn more and get hands-on on a practice floor. Call Lägler North America to schedule one-day training and Lägler Premium Sanding Technology (PST®)
certification in Denver. You can get a one-on-one session or bring your crew (up to five in a class).
Learn more about PST®.
Schedule your one-day training now by calling us at 800-848-6635 (800-8-HUMMEL).
Karleugen Lägler is director of Lägler GmbH. With 50 years in the floor sander manufacturing company, he is the world’s leading floor sanding expert.
Lägler GmbH offers free downloads of its “Sanding of Wooden Floors” manual in six languages at laegler.com.
How to Minimize Sanding Efforts + Maximize Business Profits

Lägler North America, a division of Palo Duro Hardwoods, is the North American distributor of machines and parts manufactured by Eugen Lägler GmbH in Germany. We are North America’s machine repair center, and offer Lägler’s one-day Premium Sanding Technology (PST®) certification course.
Copyright © 2020 Lägler North America. All Rights Reserved.